Wednesday, November 30, 2011

AEDM Day 30: The End, and the Beginning...

      I have had an amazing time participating in Art Every Day Month! What a fantastic idea, to get a huge group of creative people into their studios and creating on a daily basis. The journey has been difficult, frustrating, exciting and challenging, I am sure I have only begun to see the far reaching effects this will have on my life as an artist. All I do know for sure right now is this;


I will get into my studio on a regular basis. Perhaps not daily, life just doesn't work that way, but often.
I will make the commitment to treat my art seriously, not just squeeze it in when it is convenient.
I will trust that I am right where I need to be.
I will start to show my work to other people, with the ultimate goal of gaining recognition as an artist. Validation!


Thank you all for this wonderful month and all your beautiful support! Keep flying, keep dreaming and, above all, keep creating! Enjoy...


I created this collage using Picasa 3, which is a free download, and very easy to learn. Thank you Deborah Velasquez, for the inspiration for this piece. You are right, it is hard to do, but once you learn it, you get it! 

Tuesday, November 29, 2011

AEDM Day 29: Experiments with Foam Stamp Making...

 I finally got a chance to go to the dollar store, and score some fun-foam shapes to try the new heat tool/rubber stamp technique that Rachel Payne so graciously shared with us last week. She posted about a tutorial by Tracy Bunkers;
and I have been wanting to try it every since... Thank you Rachel and Traci!
I found these cute little foam puzzles, which were the perfect size after trimming the nubs off. So here I tried them with a crochet doily...
a locket...
and some lace...
Here is a picture of the finished stamps, and the images they make...
I really like how they turned out, I can see a lot of uses in my art. The best part? Well there are two, actually, they are cheap, cheap, cheap to make, and when I messed one up, I just reheated it and the mistake disappeared! Now I am running around the house looking for other interesting things to copy. Give it a try, I think you will like it too. Enjoy...

Saturday, November 26, 2011

Art Every Day Month Day 26: A work in progress...

 When I showed this drawing of my lady in a previous post, I was showing how you can reuse a piece of work in other projects. Well, this is the work I originally intended this sketch for. My plan has gone in a couple directions, so I have started two canvases, instead of just this one. My inspiration came around veterans day, when I was thinking and praying for all the wives, mothers, sweethearts and daughters, waiting for their soldiers to come home from war. This piece, as well as the other one I am working on, is in honor of all their love, self sufficiency and sacrifices. It is entitled, "She Waits" and incorporates vintage images from WW2 and newspaper articles from 1944, which we found under the siding of my daughters house this summer...Let's see which one comes out the closest to my vision. Enjoy...

Thursday, November 24, 2011

AEDM Day 24: Happy Thanksgiving!

Happy Thanksgiving Everybody!


No art today, unless you include the "art of conversation"! Spending the day with family and friends, lots of food, fights and jaw wagging! I hope this holiday finds you warm and safe, and just where you want to be...Enjoy!
PS. Try to avoid falling into the trap of Black Friday shopping. It just isn't worth it, stay home and eat leftovers! :)

Tuesday, November 22, 2011

AEDM Day:22 Late, late, late...

I didn't get a lot of time in my studio today, too many arrangements to make, getting ready for Thanksgiving. But as I was glancing through the latest issue of Country Living Magazine, I came across this page...

    Take a look at these bright little mushrooms, and the decoupaged fox! The bottle brush polar bear is adorable, though a tad pricey a $6 each. I thought the wildlife theme of  these ornaments was great, and even though I don't plan to put up a tree this year, (this is our first Christmas as empty-nesters, and neither of our grown children are able to make it home.) I just couldn't resist making some mushroom ornaments. The article says these mushrooms are painted fabric, but I thought that sounded to difficult, so I sculpted mine from Creative Paperclay.

     Very easy to work with, and they dry super light and can then be painted. As you can see, I am not quite done putting the spots on, and I have yet to add the loops for hangers, but I do think they turned out cute. If I ever have a tree again, these will be a sweet addition. Enjoy...

Monday, November 21, 2011

Art Every Day Month Day 21: Zentangling...

Today I am working on a Christmas gift for my grand niece and nephew. On a recent visit to Spokane, I purchased this wonderful book, Zentangle 4 by Suzanne McNeil.

   I was intrigued by this art form, and liked the idea that I could bring it with me anywhere and required only a handful of supplies to achieve some impressive results...
What I didn't expect was how relaxing the process can be. I started "zentangling" that night, during a family gathering, since every other adult was watching the UFC, and as I drew, my tiny grandniece and grandnephew were slowly drawn-in. They were fascinated watching me, and called out for different shapes to start a pattern, the dragonfly above was one of their suggestions. Now these little ones are only 3 and 5 years old, yet they sat quietly for over an hour watching me draw! I guess that is the "zen" in zentangling...
  After I finished my first tangle, they begged for another. At this point, I borrowed their grandpas office and printed copies for each of them. Then, as I was drawing, they sat next to me with colored pencils, coloring in their own tangles. For a total of three hours, we were pleasantly occupied, without a squabble, or whine at all. I drew my brand new sharpie pen dry!
  So I am now creating a series of tangles, with the plan to bind copies into a coloring book for each of them. I really think they will enjoy the books, and I will feel better about giving them something handmade and heart felt, rather than another plastic toy to be lost in a host of other plastic toys...
As a special gift for their mother, my niece, I traced out each of their hands onto a piece of water color paper, and am creating a tangle out of each one, this is the first. I think these will make a beautiful keepsake, when matted and framed.
  I have heard this art form referred to as both Zentangle, and Zendoodle

Find more information on Zentangle at; http://www.zentangle.com/

Sunday, November 20, 2011

Art Every Day Month Day 20 A page for my art journal...

Today I decided to do something just for me, so I played around in my art journal. This journal is made from a huge atlas I picked up for a song, and gives me lots of room to stretch my creative wings. This page was inspired by my fellow flier, Deborah Velasquez's recent post about her hand-carved owl stamp, and a sweet video she shared called "Lovely Owl". I remembered having these owl pictures, dug them out and played. Enjoy...

Saturday, November 19, 2011

Art Every Day Month Day 19: My canvas order has arrived!

Today I thought I would share my early Christmas present with you. I decided to order a batch of canvas boards from Dick Blick. I found their Econo Canvas Panel 24 packs, and the prices seemed too good to be true. So I went ahead and ordered a couple in small sizes, just to see their quality. I am pleasantly surprised! They seem just as nice as any of the others, maybe the canvas is a little courser but with my collages, that isn't a problem. I ordered the 4" x 4", the 5" x 7", and the 8" x 10". The prices per bundle of 24 were respectively,  $ 2.87, $5.93 and $14.84. That is a whole lot of working surface for not much money! I will keep you posted on how well they hold up to water and glue...I also wanted to try a few landscape size boards, 4" x 8", and 6" x 12", which are not offered in the econo bundles, and came individually wrapped for $.43 and $.72. Still very reasonable prices. I replaced my long lost rubber brayer and am looking forward to playing with my new set of water soluble oil pastels! Not trying to make an ad for DB, but I think as artists we need to share our sources and experiences with each other! Enjoy...

Friday, November 18, 2011

Art Every Day Month Day 18

I got a little side tracked putting out fires today, so I was very late getting into my studio. Since the background was on this piece, I went ahead and finished it up. After this first picture, I edged the main focal images with water soluble crayons, and blended them in. I use this finishing touch on all my pieces, followed by a final coat of gel medium. However, this time I decided to play with acrylic encaustic instead. I mixed a small batch using heavy gel medium, clear tar gel and a tiny drop of gold acrylic paint to mimic the color of beeswax. I had tried this on a couple of small pieces with positive results. Not this time...
As you can see, the encaustic had an adverse effect on the water-soluble crayon. I am guessing because it takes a lot longer to dry, it gave the unfixed crayon a chance to reactivate and start to smear. Yuck...Unfortunately, I did not catch this in time to scrape it off before it dried. If I had simply added a coat of gel medium, let it dry, as usual, THEN added the acrylic encaustic, I would not have ruined the canvas. Ah well, live and learn. So go ahead and try it out, it really does normally add a beautiful effect, but be cautious, seal your work, and keep an eye on it as it dries! Enjoy...

Thursday, November 17, 2011

AEDM: 17 Using your printer to simplify your art...

I decided to get tricky today and try something I saw on a YouTube video recently. The artist showed a sketch she had done, and when she got it just right, she made multiple copies in different sizes to use anywhere from ATCs to full size canvases. I thought that was a very clever idea, and tried it myself. On the left is the original sketch I posted here yesterday. I then scanned and printed it onto light weight sketch paper. It worked like a charm, fed right through! I didn't use regular copy paper, since I planned to color her in with pastels, and felt the paper should be strong and have a little "tooth". I hand colored the copy, saving the original for future color experiments, and sprayed it with a fixative. The hand colored copy can be seen in the middle. Then I scanned THAT in and played with the size. The far right is at 100%, the smaller ones are 50% and 30% respectively. Both the smaller ones fit an ATC, and surprisingly enough, they look better than the original. The printer gave them a softer color, and the reduced size hid some small mistakes. BONUS! The full sized I plan to use on a canvas, which was the plan from the beginning. I am pretty happy with the way these turned out, and here is a scan of the ATC I created using the 50% copy.
I wouldn't want to use the exact same image over and over, but it is nice to get a little more mileage out of a favorite piece. I hope this gives you some ideas on different ways to use your own work. Enjoy...

Wednesday, November 16, 2011

AEDM: Day 16 Inspiration for a new piece and first sketch...

My hubby and I finally got away for a couple of well earned, long time in coming, nights together. We went to a VERY rustic cabin in the woods, the kind of rustic that means hauling firewood, a temperamental stove and putting on your boots and coat to go to the bathroom...it was quiet, restful and very very cold. We ended up racing a bad storm down the mountain, and are happy to be snug at home as we watch it piling up outside. I didn't have a chance to paint while I was there, but I did get an inspiration for my next piece and sketched out the focal image. Tomorrow I will begin a background canvas for her. I have a pretty good idea where this one is going (that's new for me)! :) Thanks for looking, enjoy...

Monday, November 14, 2011

AEDM: Day 14 The completed painting...

 I really got into the painting last night, and was able to  complete it, more or less. ( I may add more words, I have to wait and see). I used gel medium to glue down my copied and enlarged sketch, but did not put any over the top. I wanted the paper to still have some "tooth" because I was using oil pastels to color her in, along with Inktense pencils, and I didn't think they would work as well on a slick surface.
 I have never used oil pastels before, I actually went in to buy water soluble oil pastels, but the store didn't have any. Now you would think I would just wait for the others to arrive in the mail, but I just couldn't resist. I first colored in her hair, facial features and clothing with my Inktense pencils, then went over them with a damp paint brush to blend. If there is an area that you want lighter, don't put any ink there, drag a bit in with your paintbrush, that's a good way to shade. At this point I also glued down the word kindness, as I wasn't sure if the gel medium would stick to the oil pastels. Then I started coloring in the flesh with pastels. At first they went on chunky, like a crayon, and I thought I had ruined the piece. I couldn't figure out how you could get any details out of them at all. Then I started adding white over the top of the flesh color I first used, and that's when the creaminess of the medium made it's self known. I used my finger to start blending the two colors all over the sketch, and added shadow with a gold tone. Everything smoothed out beautifully. I put in a little more white in highlighted areas, and added the blush to her cheeks. I didn't want to give her clown rouge, so I scribbled a bit of pink onto some scrap paper, and then picked some up on the end of my finger, and lightly rubbed it into her cheeks. I used a paper sketching stub to get into tight areas, and to clean some pastel away from the black sketch lines. I like how she turned out. Of course now I was faced with the issue of pastels staying smearable. They don't actually dry, you have to seal them. A little online research says to spray them with a workable fixative....? I don't know what that is, but I sure don't have any. I decided to try just another coat of medium. I tested on a small part of her neck. After it dried, it was fine. It seemed to seal up nicely, so I went ahead and covered her. I then added the flowers to her headband, and another coat of medium.
Here is a bit of detail on the birdhouse. Rubber stamps, ink, stamps and a new roof. Everything is edged and highlighted with water soluble crayons, and there you go...all done. Thanks for taking this little journey with me, I hope that seeing it broken into steps helps a bit. Enjoy...

Sunday, November 13, 2011

AEDM: Day 13 A City-scape Stencil

I spent the better part of last evening adding more layers and details to my 12" x 12" canvas. At this point, I remembered a diecut I have had for years, from back when I did a lot of scrapbooking. I unearthed it, along with a whole lot of other interesting things I have been saving for years. At first I thought I would just include it in my collage, but it was cut from cardstock, which made me think it might work better as a stencil. So here you can see the silhouette that was created by dry brushing blue acrylic paint around the edges of the diecut. I used a stencil brush, and moved it in a circular motion. I really like the ghostly look, I decided to shift it just a little and add another row of buildings, below the first...I then put the diecut back in it's original place, and used a toothbrush and watered down white acrylic paint to splatter stars around the buildings. I am very happy with the effect, and I still have the diecut to use on another collage. Enjoy!

Saturday, November 12, 2011

AEDM: Day 12 - Just a little collage...

I didn't have a whole lot of time to spend in my studio today, but I have been wanting to create a logo for the Artist Trading Card group I am a part of on Facebook. This little collage is only 2" x 2", amazing how much you can actually get on such a little canvas, isn't it? 

Friday, November 11, 2011

AEDM: Day 3 (11) Playing With Your Sketches...

I am not the most confident of sketch artists, in fact it is quite a challenge for me, the whole proportion and expressions thing and such. I am slowly getting better at it, but it is a steep learning curve. So when I finally produce something I am actually pleased with, I am reluctant to "mess it up". This is my way of giving myself the freedom to play. Here is a collaged and painted 12" x 12" canvas. I have used some of the background papers I created in my post yesterday. I am not quite done with it as a background, but I am close. The bird house is pretty self explanatory, and you can see, I have re-sized and cut out one of my birds from the bird page I posted about two days ago. He was a bit pale for this, so I tinted him in with a couple Inktense pencils. The girl is an enlarged and trimmed copy of my original sketch. I tried different sizes, and settled on this one. None of these elements are stuck down permanently yet, so I can move things around, audition and remove until I am pleased with the results. I will eventually start coloring in the girl, just not sure which way I want to go with that. I could use watercolors or pastels on her now, or I could glue her down with gel medium, seal her and then add acrylic paints, or maybe wait for that set of water-soluble oil pastels I just ordered.Once she is glued, I am stuck with her, so... This is how my thought process goes as I am working on a painting. I thought I would share a bit of the mystery with you, enjoy!

Thursday, November 10, 2011

AEDM: Day 2 (10) Background papers

   In keeping with my post yesterday, today I am making my own art papers to use in my paintings. I made this sheet using a 5x7 scrap of watercolor paper, water color paint, foam stamps, bubble wrap, shelf liner and acrylic craft paint. The plan is to make a large assortment of my own paper samples that I can print copies of and use to my hearts content.
   I like this idea because;
1: It is my own work, so I get to skip worrying about the whole copyright thing.
2: I can make as many copies as I want or need.
3: No problem color coordinating with my piece.
    Here you can see the original paper, and under it, an enlargement on plain copy paper. I simply ran the sample through my scanner, and selected "fit to page", and copy. It is maybe a little too monochromatic, but I think I can work with it...

Wednesday, November 9, 2011

AEDM: First for me; I am always a late bloomer!

In my quest to create art everyday, I have certain criteria I must meet, mostly... it must be portable! My hubby wants to do the RV thing and that means I must think of ways to carry my supplies with me and be able to work in small places. So I have started to sketch more, something I rarely do, but I am really beginning to enjoy it. Perhaps these sketches will be printed and later combined into new art on a larger scale, you never know. I drew these birds last evening while watching TV, then added the color with my Inktense pencils. I love the bright blend-able colors, and I get better control than with a brush. I have already started cutting them out, so I can scan them into my computer...

Tuesday, November 8, 2011

Layers: Creating Depth in Your Mixed Media Art...

At the request of some of my flying cohorts, I am posting this little tutorial on how I create depth and interest in my paintings. I always find it helps me to move along in a piece if I have a kind of formula to follow. I hope it helps you as well...I actually counted while creating the piece "Those Who Wish" and realized that I have at least eight layers of assorted paints and papers in it, so here is the break down.


Layer1: Tear or cut strips of paper, and glue them onto your surface using gel medium. I am using a small canvas panel as my surface, and matte medium instead of gloss. I like using the canvas panels for a couple reasons. They are very inexpensive, and they are firm enough to use a brayer on to really smooth down the papers. I find that stretched canvases have too much give for the kind of pressure I use. Here you can see the little bird picture that was the inspiration for this piece. Here I have used sheet music, a page from a technical manual, and a page from a book written in German, found at a library sale this summer.


 Layer 2: Paint over the papers with a layer of acrylic paint. I usually like to just drizzle the paint on, one or two colors at a time, and blend them on the surface with my brush. In this case, after the drizzle, I ran my brayer over the surface, I like the way it tints the papers.
 Layer 3-5: Before the papers are sealed with a coat of gel medium, it is a good time to add some details. You can see here, I have used a scrap of shelf liner to stamp and interesting texture in rust acrylic paint. Simply paint the shelf liner with your paint, lay it on your piece and run a brayer over it, moving it around to create a random pattern. This is also a perfect time to stamp any images. The paper is still porous, so the ink can really grab. Any stamping after you seal this layer, will have to be done with permanent ink. You can see I have also added some scraps of decorative papers, and stamped images over them as well.
  I save caps from spray cans and bottles for making different sized circles. This is the time to add bubble wrap stampings, circles and more detail with acrylic paints. I have used a dry brush with  walnut colored paint to soften the edges of the canvas board. I like the way it starts to frame and focus your eye towards the middle of the piece.
 Layer 6: I know we are on layer six, but this could easily be seven, eight or nine! The best depth is achieved by constantly adding more, some times very subtle details, that blend in, but add a richness. Now I will try a gel medium transfer, something I just learned, but haven't tried. What you see here is the back-side of the bird picture, laid into a thick coat of medium. I went ahead and sealed the entire piece with the medium, then placed the image in my chosen spot. I then smoothed it out as best I could, and waited for it to dry.


 Now I have dampened the back of the bird image, and am gently rubbing the paper off the back...


I must have been too impatient, some of the transfer was lost...this means I either did not burnish it down enough, or I didn't wait for it to completely dry. Not to worry, I have a backup plan! 
The same magazine happened to have a smaller version of the image, so I will add that on top. I love the way the failed transfer echos the clearer image. Happy accident after all! Coat everything with gel medium again.  Every time you do this, it adds just a little spacing between layers, and slightly "fuzzes" the previous layer, this is what will add the depth you are looking for. I have added a foam stamped B, (for bird) and I
am ready to add the final meaningful words.


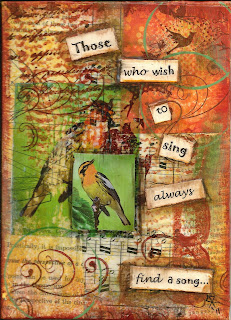
Layer ?: At this point I am so far into the piece, I have no idea where we are! I type and retype the message I want on my computer, and play with different fonts as I go. Then I will print them out and snip them into individual words, to be reassembled on my panel. This is where you can accent different sections of the piece, using either Derwent Inktense ink pencils or Caran d'Ache Neocolor water-soluble crayons, ( both give some very nice, rich colors) I outline my focal pieces. This means the words, the bird, which ever parts I want to really stand out. With a damp brush, blend these colors in, creating a shadow effect around your focals. Don't forget to sign your work! A final full coat of gel medium is then applied, to seal in these last colors.


That's how I do it, many, many layers! Just when you think you are done, add another layer...
 I hope you have fun playing with this process, and share your creations with the rest of us! Enjoy...